Trading a Schedule - Legacy
If authorized, employees in an organization unit may be able to trade a shift. Shifts can only be traded after the organization unit schedule is posted and during the time frame determined by the values entered on .
To trade a schedule with another employee, complete the following steps:
-
From the tool bar, select the Employee button.
-
Click on the My Time Card button in the left pane.
Note:
Authorized users can submit requests for other employees. Use the Employee Search page to find and open the employee record.
-
Click on the Open Current Schedule button in the Employee Actions section in the left pane.
-
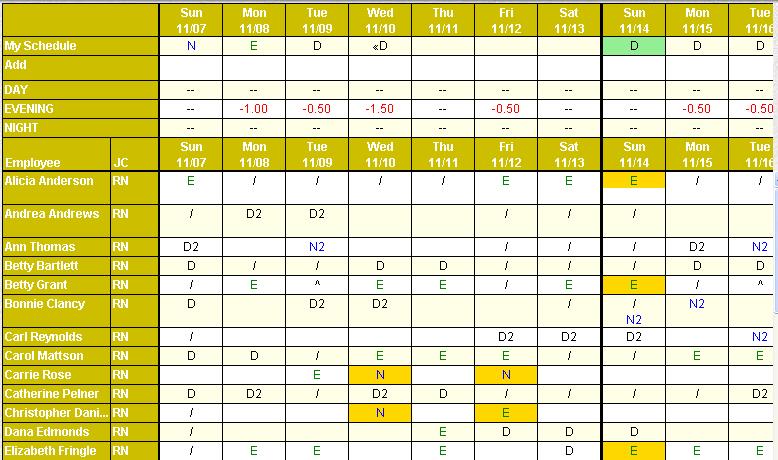
Highlight the activity code on the My Schedule portion of the self scheduling grid.
The Published Schedule dialog appears.
-
Click on the Trade button.
Note:
If the Trade button does not appear on the schedule, either trading has not been configured for the organization unit, this shift is not in the time frame allowed for trading, or the system is configured so that trades can be submitted on the Monthly View screen.
-
Trading options are highlighted on the Employee Grid on the lower section.
The following validations are automatically done to determine which shifts get highlighted. At this point in the process, the Selection Style you chose is not validating; that validation occurs after a trade is attempted.
-
Both employees must have profile permissions to the shifts that are to be traded.
Example:
Emp1 is trading SchedA. Emp2's shift is SchedB. Emp1 must have profile permissions to SchedB and Emp2 must have profile permissions to SchedA.
-
The shift lengths must be the same (not including lunch lengths).
-
There can be no overlap of either of the traded shifts with other existing (non-traded) shifts.
-
There can be no overlap of either of the traded shifts with other situations causing either employee to not be available.
Example:
Either employee has an overlapping education class, approved unavailability, approved recurring unavailability, or other approved calendar requests. Pending requests are not considered in this validation.
Note:
If employees are allowed to select shifts that are not highlighted, the new shift may be of a different length than the original shift, and the employee may not be eligible to work it without exceeding approved or overtime hours.
-
The setting to determine if employees can trade only with shifts that are highlighted is set up on Organization Unit Indicator Self Scheduling Standard 2.
-
The setting to determine if employees can trade with shifts that are not in the same week is set up on Organization Unit Indicator Self Scheduling Standard 1.
-
-
In the Employee Grid, click on the shift to be traded.
The Trade Schedule dialog appears.
-
Enter any Comments in the free-form text field.
-
To continue with the save, click on the Submit Trade button.
-
The system validates both trading employee shifts submitted to determine if any scheduling assignment rules are being violated by the trade, based on the Shift Trade Selection Style assigned to the Self Schedule Tab on the Staffing Configuration screen of the organization unit. If any rules are being violated, a message is displayed. The user may have the option to override the warnings and continue with the trade.
-
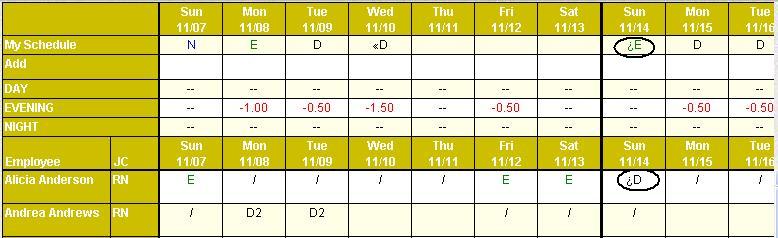
The traded shifts for both employees are displayed with an icon to the left of the activity code, indicating they are pending approval.
The trade now needs to be accepted by the second employee involved in the trade (the "accepting" employee).
-
Both employees will see the transaction listed in the My Trade Requests card on the Home page.
The second employee involved in the trade (the "accepting" employee) sees the status icon of Waiting Approval.
-
The accepting employee can access the trade by clicking the folder icon on the request. The employee can also go to and search for records with a status of Waiting Approval.
-
To decline this schedule, click on the Cancel button. The status of the request is changed to Canceled
 , and the schedules are returned to the originally assigned employees.
Note:
Organization Unit Indicator Self Scheduling Standard 9 determines whether trades can only be canceled if they are still within the trading window defined by the Schedule Trade Advance Days value in the Staffing Configuration screen.
-
To accept this schedule, click on the Accept button. The status of the trade is changed to Requested
 .
. -
Once approved by the second employee, Schedule Trades are finalized (approved, denied, canceled) by supervisors through the Trade Requests screen in .
-
After the traded schedules are approved, the new schedule assignments are displayed on the screen, and the trade symbols are no longer visible. Both employees are notified that the trade has been approved on their Home Page in the My Trade Requests section.
-
Also, if the Event Subscriptions feature is set up to notify the employees by email and/or portal message, a notification is sent.
Note:
If the trade is denied or canceled by the supervisor, the schedules revert back to the originally assigned employees. Both employees are also notified of the change.
Depending on Organization Unit Indicator Sched Incentive Standard 6, schedules awarded from a schedule incentive may or may not be traded nor offered to other employees through the self scheduling screen.
|
The following related topics are available: Viewing the Self Schedule Screen Editing a Self Scheduled Shift |
Requesting Comments
Any comments that were entered by the employee requesting the trade or offer when it was submitted.