Employee Navigator
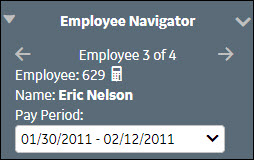
The Employee Navigator is used to change the pay period view of the current record, to search for the record of another employee when an employee record is already open, or to scroll between records of employees when multiple records were selected during an employee search.
The following actions are available in the Employee Navigator.
|
The following additional section options are available in the left pane: |
Selecting the Pay Period View
The information displayed on many of the cards on the TCS (Time Card Summary) are specific to the pay period selected in the left pane, such as the benefit balances, pay distribution information, or deduction values. When the Time Card Report is generated, it displays information for the selected pay period.
The current pay period is defaulted when the employee record is opened. You can change the pay period, so you can view the previous pay period or the next pay period.
Click on the down arrow icon to display the pay period menu, then select the pay period you wish to view.
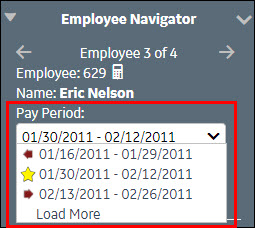
Pay Period Icons:
|
|
Previous Pay Period |
Click this arrow to move to the pay period before the current one. |
|
|
Current Pay Period |
This icon indicates the date range of the current pay period. |
|
|
Next Pay Period |
Click this arrow to move to the pay period after the current one. |
Load More Pay Periods
From the Employee Navigator you can access pay periods other than those in the pay period menu. To view hours for any pay period, do the following:
-
Expand the pay period list and select Load More.
The pay period search screen opens.
-
Enter a date range in the search criteria fields, and click the Search button.
-
Date Range Begin:
The earliest date of the range to search for a pay period. Pay periods that overlap this date are included in the search results.
-
Date Range End:
The latest date of the range to search for a pay period. Pay periods that overlap this date are included in the search results.
The pay periods that occur during the queried date range are listed.
-
-
To open the Hours Worked summary of a pay period, click the folder next to a record.
The Hours Worked summary shows a pay period view of the hours an employee accumulated during the selected pay period, along with total hours per pay code. A ? symbol identifies pay codes that accumulate specifically toward worked hours.
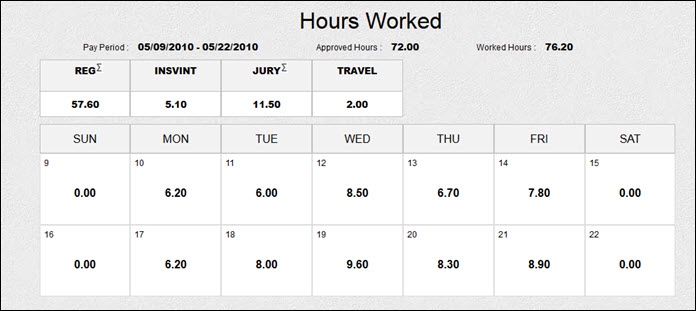
The pay codes summarized are ordered based on their Display Priority values on the Pay Code: General screen.
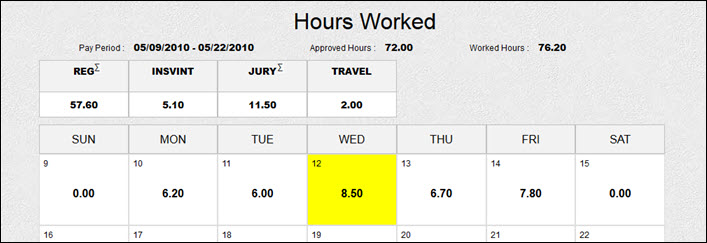
Click any day in the pay period for a breakdown of the transactions on the selected day.
Tip:
Hours only accumulate toward the hours worked and display on this screen if the associated pay codes have the following settings configured:
-
Displayed In Summary field on the Pay Code: General screen is set to Yes.
-
Pay Code Indicator: System Standard 1 on the Pay Code: Indicators screen is set to Y.
-
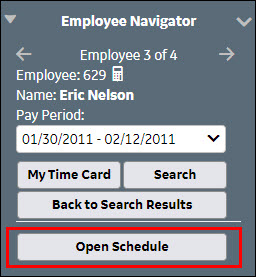
Opening the Schedule Screen
By clicking on the Open Schedule button, you can open the Schedule screen for this employee's Home labor distribution to the scheduling period that contains the date range of the current pay period.
Once the schedule is open, you can make any changes to this employee's schedule and the schedules of other employees in the labor distribution. You will have the same authorization rights for adding, editing, or viewing the schedule.
Adding a New Employee Record
To add a new employee record, click the Search button and then the Add button. A screen with multiple tabs is displayed to enter the new employee information.
For more information, see Adding a New Employee Record.
Searching for a Different Employee Record:
To search for a different employee record, click the Search button to open the Employee Search screen. Enter the search criteria and click the Search button.
Scrolling Through Selected Employee Records
Multiple employee records can be selected from the search, but only one employee record is open and active at a time. The additional selected employee records can be viewed by selecting the right or left arrows in the Employee Navigator.
Scrolling Icons:
|
|
Previous Employee Record |
Click this arrow to move to the previous employee record, as listed on the Employee Search results list. Hover the cursor over this arrow to view the name of the previous employee record. |
|
|
Next Employee Record |
Click this arrow to move to the next employee record, as listed on the Employee Search results list. Hover the cursor over this arrow to view the name of the next employee record. |
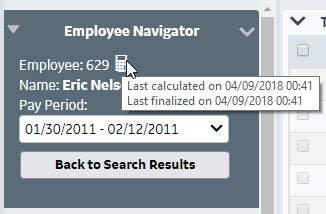
Viewing Employee Status Icons
Point to the icons to the right of the employee number to display a tool tip regarding the icons displayed.
The following status icons may be displayed:
|
|
Finalized |
All modifications to data or new information from input devices has been processed on this record. Hover the cursor over this icon to display a tool tip indicating the last time the employee was calculated and finalized. |
|
|
Approved |
The approving user has reviewed the record and approved it for payroll processing. Hover the cursor over this icon to display a tool tip indicating the name of the approving supervisor. |
|
|
Employee Sign Off |
The employee has signed off on his/her employee time card. When the employee clicks the Employee Sign Off button in the Employee Actions pane, this icon is displayed. |
|
|
Terminated |
The employee has a terminated status. Hover the cursor over the icon to display the termination date. Note: This icon is displayed when the Employee Status field in the employee General record is set to an employee status value which has a Classification setting of "Terminated". It is not triggered by a date in the Termination Date field. |

Viewing Employee Locks
A lock icon to the right of the employee number indicates the employee's time card information is being reviewed and the supervisor has applied a lock. Point to the icon to display a tool tip indicating the user who enabled the lock.
Some screens of the employee record are not editable when certain types of locks are applied to the record. The buttons to access those screens are grayed out.
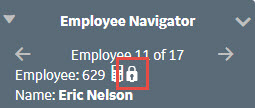
The color of the diamond behind the lock indicates the type of lock.
|
|
Courtesy Lock |
This lock indicates a user has taken responsibility for handling this specific employee time card record. The record is still accessible and editable by other users. |
|
|
Employee Lock |
This lock indicates a specific supervisor has locked this employee time card record. Certain employee action fields are disabled. The record can only be accessed in read-only mode. |
|
|
Supervisor Lock |
This lock prevents all supervisors from accessing the time card records and making any further changes to the records. This is used when closing a payroll for processing. |