Creating a Rotating Schedule Template
Complete the following steps create a Rotating Schedule Template. Click on the links below to navigate to more information on each step.
Step 1: Set up the General information
Step 2: Select the days to add schedules
Step 3: Add the activity details to the selected days
Step 4: Assign the rotating schedule template to the employees
Step 1: Set Up the General Information
-
From , select the Rotating Schedule Template option.
-
Under the Rotating Schedule Actions in the left pane, click on the Add button.
-
Enter a Code to identify this rotating schedule template.
-
Enter a Description to describe this rotating schedule template.
-
In the Begin Week Number field, enter the number of the week that is to be assigned to the week containing the Effective Date.
-
Enter the Number of Weeks to complete a rotation cycle for employees assigned to this template. The system will replicate the rotation to fill all weeks of the scheduling period.
-
Enter the Organization Unit information to identify the labor distribution where this rotating schedule is assigned.
-
Enter the Effective Date when this rotating schedule is to begin. Use the calendar in the right pane, or type in the date.
-
Enter the Expiration Date of this rotating schedule, if applicable. If this rotation has no pre-set expiration date, leave this field blank.
-
Save the record.
Step 2: Select the Days to Add Schedules
-
Click on the Rotation section button in the left pane to select the days to configure the rotating calendar.
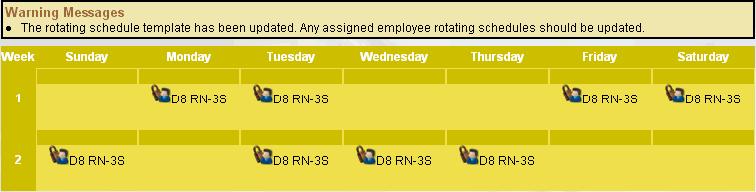
The grid shows the rotation for the indicated Number of Weeks, as entered in the General screen.
-
Select the cells to be assigned the same activity code and profile combination (using one of the methods described below).
-
To select a single cell, click on the upper border of the cell to highlight it.

-
To select multiple adjacent days (horizontally or vertically), hold down the SHIFT key, and then click on the upper border of the first cell, then click on the upper border of the last cell. The entire range of cells is highlighted.

-
To select multiple non-adjacent days, hold down the CONTROL key on the keyboard, then click on the upper border of each cell to be configured. Each selected day is highlighted.

-
Step 3: Add the Activity Details to the Selected Days
-
Click on the Add Activity button in the left pane.
-
Enter the Position Code and Profile Code to be assigned to the employees on the selected days.
-
Enter the Activity Code to be assigned to the employees on the selected days.
-
If applicable, enter the Organization Unit where the employees should be scheduled.
-
Click Save at the bottom of the screen.
-
If additional activity code/profile combinations are to be set, repeat steps 1-5
-
The schedules are indicated by the core schedule icon
 .
.
Step 4: Assign the Rotating Schedule Template to the Employees
-
Click on the Assigned Employees section button in the left pane to open the screen to assign employees to this template.
-
Click on the Assign button in the left pane. The Employee Search screen is displayed. Enter the criteria to search for an employee. To open the advanced search options, click on the Advanced button in the left pane.
-
Check the box to the left of each employee to be assigned to this template, then click on the icon
 to add the employees to the list.
The selected employees are now assigned to the template.
A rotating schedule identical to the template is available in .